Posture and the Three Basic Tones: From Sitting Down to Striking Clean
Posture, hand shape, striking position — tone perception for Exercises 2.2-2.4
Last chapter we met the cajon and its three tones. This chapter solves the most critical question: how to sit and how to strike to get a clean sound.
Many beginners sound "muffled, loose, messy" — not because the drum is bad, but because posture and hand shape are off. This chapter covers Stage One: single-tone perception.
Posture: weight on your feet, not on the box
The key points of sitting correctly:
- Sit on the back edge of the body (the side nearest you), not in the middle;
- Both feet flat on the floor, slightly apart — weight on the tripod of your feet and sit bones;
- Lean slightly forward, with the face tilting slightly back, so both hands fall naturally over the face;
- The drum's height should make your thighs roughly parallel to the floor — too high and your arms hover, too low and you hunch.
Check: once seated, your relaxed hands should easily reach the top edge of the face without arching your back.
Weight on your feet means you can shift your body forward and back to change the striking angle, and it lets the box sit fully on the floor for a fatter bass.
Hand shape: relaxation is the precondition for everything
- Keep both hands relaxed, fingers naturally together — not stiffly spread;
- The wrist is the core of the force; the arm only "moves the hand into position";
- Raise the wrist about 10-20 cm before striking and hit with a wrist whip, not an arm swing.
Two hands: divide the roles first, then alternate
The two hands are not "left vs right in combat" — each has a role and they cooperate. Get this wrong and everything later — eighth notes, tempo — hits the "single-hand ceiling".
1. Lead hand and support hand
- Most people lead with the right hand (lefties, the opposite) — the lead hand is stronger and more controlled;
- Recommended division: B (bass) with the lead hand's palm heel, S (slap) with the support hand, s (ghost) trained on both hands;
- The division is not a law — some players strike both B and S with the right hand and it works. What matters is both hands participate; neither may sit idle;
- Hand order comes before role: in alternating practice, which hand goes first is fixed (R L R L), while the tone role flexes with the score — for example, slap-bass alternation (S B S B) puts the bass on the support hand: a great chance to balance the two hands.
2. Why you can't rely on one hand
- One hand only: strength gets uneven and speed hits a ceiling — Chapter 7's eighth notes and Chapter 8's tempo work will definitely stall;
- Two hands share the load: every note has its own hand, small motions that don't interfere, and the speed ceiling doubles.
3. The alternating principle (R L R L)
- For consecutive strikes, alternate hands as much as possible — after the left finishes, the right takes over, like feet alternating when walking;
- Alternation keeps both hands "on standby", so neither wears out;
- Chapter 4's bass-slap alternation (B S B S) is the first real use of alternation: B with the right hand, S with the left, switching every beat.
Check: play 30 seconds of bass-slap alternation; if both hands strike evenly and neither tires, your division is healthy.
4. The ghost s is great material for waking up the support hand
- s is light and small-motioned — playing s with the support hand is far easier than S, and it brings the underused hand to life;
- The s in Chapter 5's anchor groove is the support hand's home turf — build that feel now.
💡 The score is all one tone — what you train is your hands: left hand beats 1, right hand beats 2, alternating. When both hands hit with equal strength and neither tires, your division is healthy.
The standard way to play the three tones
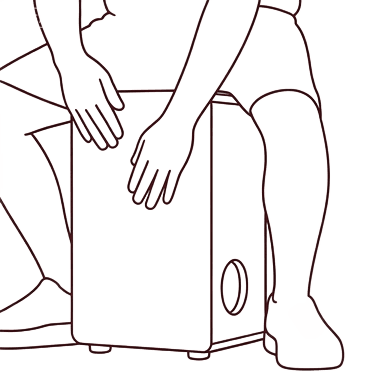
B bass (below center of the face) — Exercise 2.2 All Bass
- Strike with the palm heel just below the center, like tapping a watermelon;
- Lift off immediately after striking so the face vibrates freely — holding it down chokes the sound;
- Keep every beat even and feel the chest resonance;
- It should sound like a "Dum" — thick, with depth.
💡 Tip: strike with the heel of your palm just below the center of the face, like tapping a watermelon. Keep every beat at the same strength and feel the chest resonance.
S slap (upper corner edge) — Exercise 2.3 All Slap
- Keep fingers together and strike the upper corner edge quickly with the knuckle joints — crisp, like knocking on a door;
- Contact time at the moment of impact is extremely short;
- It should sound like a "Tah" — bright, with grain (the snare rattle mostly comes from here).
💡 Tip: keep your fingers together and strike the upper corner of the face quickly with the knuckle joints — crisp, like knocking on a door.
s ghost (light touch) — Exercise 2.4 All Ghost
- Touch the face lightly with your fingers, almost no force;
- Barely audible, like a heartbeat in the background;
- The hardest to control — be patient: it tests your ability to be "quiet".
💡 Tip: touch the drum face lightly with your fingers, almost no force. The sound is barely there, like a heartbeat in the background. The hardest tone to control — be patient.
Rests: part of the music too
In this tutorial, · means rest: the hand hovers about 1cm above the face — no force, don't pull away.
- A rest is not "nothing" — it's "space";
- Keep the hand near the striking position so the next beat can land on time;
- From Chapter 3 on, every pattern has rests — make "holding still" a habit first.
💡 A rest is not "nothing" — it is "standby": the hand hovers 1cm above the striking position, no force, don't pull away. Keep counting in your head; the groove never stops.
Your first five-minute practice
Open the "Practice" page and select All Bass, All Slap, All Ghost (Exercises 2.2, 2.3, 2.4) in order, at 60-70 BPM, one minute per tone. Requirement: every sound clean and independent — better slow than muddy.
- Playing B: is it thick, and not choked by the palm?
- Playing S: is there a clear "Tah" and rattle?
- Playing s: is it barely there, yet still clear?
- After all three tones: have your hands returned to relaxed?
What you take away from this chapter
- Weight on your feet — a stable seat lets you move freely;
- Whip the wrist relaxed — the power comes from the wrist, not the arm;
- B: below center, big surface; S: upper corner, short contact; s: light touch, barely there; on rests, hold the hand 1cm above the face.
Next chapter, reading music: time signatures, note values, and this tutorial's notation system — so you can read a score and understand a metronome.